Nov 20, 2024

Attribution Masterclass: My Notes - Pt. 3 - MMM, Incrementality

3. MMM, Incrementality

3.1. Intro

  1. Shortcomings of click-based attribution
    1. Digital campaigns w/o clicks, e.g. video campaigns
    1. Dark social
    1. Cross-device attribution, since click attribution can be made only in the same session
    1. Long sales journeys, conversions happening outside of lookback windows

3.2. Incrementality

  1. Click incrementality
    1. It’s not just sales or conversions, it can also be paid brand search clicks per se
    1. This is interesting also to understand cannibalization btw Paid and Organic
    1. There’s a study by Google showing how many clicks were incremental and how many were cannibalized to Organic Search
    1. Here’s another case history by Barbara Galiza Measuring incremental impressions, clicks and conversions for Paid Search (Methodology + Google Sheet Template)
  1. Conversion incrementality
    1. There are cases where clicks are not incremental but conversions are
    1. This tries to estimate conversions that wouldn’t have happened without a specific mktg initiative
  1. How incrementality is measured
    1. Holdout tests are performed turning off a campaign to all or certain audiences
    1. Geofencing is a technique similar to the previous one but in this case campaigns are turned off based on geographical areas. GeoLift is an R package made by Meta helping with this GeoLift Walkthrough | GeoLift
    1. Causal inference, is a statistical model measuring correlation btw campaigns and sales.
  1. Design a test
    1. Control targeting, be sure you can select audiences precisely
    1. Experiment control, start and stop the experiment as needed
    1. Conversion event tracking, it’s important to measure frequency of conversions within the test group and overall
    1. Campaign metrics, analyze spend and impressions for both control and test group

3.3. MMM

  1. MMM in layman’s terms way
    1. There are a bunch of inputs and outputs
    1. MMM tries to find the correlation btw inputs and outputs
  1. Understanding Bayesian models
    1. Prior knowledge, Bayesian models need historical data, for instance for daily data you need at least 1 year or even more
    1. Data updates, the model gets updated when new data arrives
    1. Probabilistic approach, probabilities are assigned to different outcomes based on input data
  1. MMM and Bayesian models
    1. Simulations: MMM runs simulations
    1. Statistical analysis: Correlation is calculated for each simulation
    1. Channel impact: Finally MMM isolates the impact of each mktg channel
  1. Requirements for MMM
    1. Date-level datasets, data granularity should be daily or weekly depending on mktg activities involved and the type of business
    1. Mktg activity data, all media activities should be included
    1. Target metric, of course this depends especially on the business
    1. Historical data, at least 1 or 2 years of data are needed
    1. Sample dataset generator by Timo Dechau https://replit.com/@TimoDechau/Marketing-Mix-Model-Playground
  1. When to use MMM and limitations
    1. There’s a need for extensive enough datasets
    1. Time and understanding to fine tune MMM is important
    1. It’s good for high-level channel decisions
    1. Barbara recommends 6 figures per month is the minimum recommended spend for those who want to use MMM

Nov 14, 2024

Attribution Masterclass: My Notes - Pt. 2 - Multi-Touch Attribution

  1. It’s an old topic but still one of the most important ones
  1. We still have issues with UTMs:
    1. Sometimes are missing
    1. They are inconsistent
  1. This is why you need a UTM strategy:
    1. When you own a link remember to tag it!
    1. You need a process
    1. You can do it manually
    1. But even automatically, defining rules on the 3rd party platforms
  1. Techniques for UTM paramaters definition
    1. Random ID in utm_campaign
    1. Don’t use UTM parameters inside your own website
    2. [More on this available in video recordings]
  1. References about UTM parameters
    1. Campaign (UTM) Parameter Naming Conventions revisited: Cryptic vs. Positional vs. Key-Value Notation | by Lukas Oldenburg | Medium by Lukas Oldenburg
    1. How to Improve Paid Media Analysis and Performance with Naming Conventions By Barbara Galiza.

2.2. User journeys and user stitching

  1. Simplest example of user journey: landing page > conversion
    1. No issues with this
    1. UTMs are probably there
    1. Hard for cookies to be missed (but see below about this point)
  1. SAAS example: landing page on www.* > user creates an account on app.* > user buys a subscription through Stripe
    1. Issues:
      1. Most marketers take care of the account creation and stop there but this still doesn’t tell what mktg initiative lead to subscriptions
      1. This is based on IPs or cookies but we actually have no real control about them (e.g. Safari changing settings).
    1. The solution to these issues is the use of user_id (GA), hubspot_lead_id (Hubspot), hashed emails or email domain IDs, and so on
  1. Ways to do user stitching is storing all the IDs you have
    1. In a Data Warehouse (DWH)
    1. Or in a leading system, for instance you decide GA is your primary platform and get Hubspot IDs data in there
  1. In the case of guest checkouts you can join client_id and transaction_id. In general it depends if we’re talking about user level attribution or order level attribution
  1. How does server-side tagging fits in this?
    1. Users using different devices are treated as separate users in client-side tracking systems
    1. This is why server-side tagging systems can help vendors - such as Meta with Facebook CAPI - optimize their campaigns
    1. One tricky issue with server-side tagging is how to handle legal consent.

2.3. How to analyze Multi-Touch Attribution (w/ Amplitude)

  1. Amplitude gives the chance to connect different data sources (e.g. BigQuery, GAds and so on)
  1. We tried the attribution models comparison with a custom table where we added a First Touch, Last Touch and Data-Driven views of the demo dataset, side by side
    1. Unfortunately this is not available with other tools - such as GA - unless you build it on your own - with BigQuery
  1. Amplitude gives the chance to create a free account and explore a demo dataset with custom charts.


Nov 6, 2024

Attribution Masterclass: My Notes - Pt. 1 - Intro to Attribution

This blog post is part of a series on marketing attribution available here

==========================

The Attribution Masterclass is a series about marketing attribution organized by Timo Dechau and Barbara Galiza. I'm thrilled to share I'm in the first cohort taking the masterclass with regular meetups every Thursday till the 21st of November.

Here follow my notes with the most important concepts shown during the masterclass. Some of the notions would be better explained using the slides the authors have made: For that, you need to actually enroll in the Masterclass: here's the page where you can sign up.

Let me recommend you to follow Timo and Barbara on Linkedin to know more about the masterclass and in general to get interesting insights and opinions on marketing attribution.

==========================

1. Intro to Attribution

1.1. Attribution journeys

  1. Typical attribution models: First Touch, Last Touch, Data-Driven [more on this later]
  1. Warning: These attribution models are all click-based so some viewed ads up in the funnel will be ignored

1.2. Debunking Attribution Myths

  1. Multi-Touch Attribution is actually not there anymore, since today it has limitations
  1. There are no tools that can solve all your attribution problems
  1. The best attribution method actually depends on specific needs
  1. Attribution is a model, with strategy and operations layer
  1. There’s not just one method and that’s it so no Single Source of Truth

1.3. Why we attribute

  1. To understand customer journeys, key touchpoints to allocate mktg budget
  1. To measure impact and optimize our strategy

1.4. Attribution and Business Strategy

  1. Business strategy is the higher-level vision informing the following (e.g. grow revenue from new customers by 10%)
  1. Marketing strategy outlines initiatives and campaigns (e.g. test new channels, involve new influencers and so on)
  1. Attribution strategy (e.g. dimensions for campaigns with new influencers: measure impressions, discount codes, run an uplift test)
  1. Major takeaway: When you plan your mktg strategy you should also plan your attribution stategy

1.5. Types of Attribution

  1. Click-Based models
    1. Last-Click, First-Click, Linear, Position-Based
    1. Data-Driven: Comprehensive Analysis, Markov Chain, Fractional Attribution, Optimization Insights
  1. View-Based models
    1. You consider also if the user has viewed an ad (for instance a view-through conversion window can be set in GAds)
    1. You can also track this by adding a pixel anywhere the user could view an ad
  1. MMM (Mktg Mix Modeling)
    1. Economic approach
    1. Channel agnostic
    1. Measuring impact
  1. Zero-Party Data
    1. How you did you hear about us? (HDYHAU), this simple question can make a difference
    1. The earlier you gather Zero-Party Data the better
    1. Customer perspective is what you get in this case
    1. Compared to other attribution types, ROI in this case is not as easy to calculate but other data/datasets about users can help with this
  1. Enhancing Attribution
    1. Rule-Based Approaches, e.g. zero-party data can weight mktg channels or activities
    1. Combination of Models, multiple forms of attribution are combined
    1. Click Prediction, data models predicting which campaign sessions have come from organic or direct clicks

Feb 12, 2024

Understanding the gcd parameter in GA4 network requests

I have a problem: I don't remember things :) That's why my Google Calendar is full of memos even for personal stuff I'm supposed to remember. 

Given this premise, you can probably imagine how much I hate the new gcd parameter, the parameter associated with Consent Mode v2 - populated with consent for the new signals ad_user_data and ad_personalization

The gcd parameter in GA4 network requests

For those who don't know what I'm talking about, I strongly recommend having a look at this guide on the Simo Ahava's blog authored by Markus Baersch, to get a deeper understanding of Consent Mode v2 and the gcd parameter. 

For the sake of this post, I will summarize here the main components of this parameter. The value passed in the gcd parameter consists of: 

  • first two integers, e.g. 11
  • followed by a letter to represent the status of the ad_storage consent signal, for instance p
  • followed by another integer separating the above consent signal from the next one, e.g. 1
  • a letter to represent the status of the analytics_storage consent signal, e.g. another p
  • integer, e.g. 1
  • letter - e.g. p - for the ad_user_data consent signal
  • integer, 1
  • letter - p - for the ad_personalization consent signal
  • finally, another integer to close the string, for instance 5.

Taking the above example, the value passed in the gcd parameter would be 11p1p1p1p5

I don't know what people think about this parameter but I find it a bit confusing and the meaning of the letters representing consent signals is hard to remember since they are not limited to the p I 've used in my example: There are 9 of them!

How beautiful is the gcs parameter instead

The good old gcs parameter is instead straightforward in my opinion since it uses binary numbers to represent the two main consent signals ad_storage and analytics_storageIt's dead simple:
  • G1 is always there, thus can be ignored
  • then there's the ad_storage consent signal, either 1 if it's been granted or 0 if not
  • finally there's the analytics_storage consent signal, again 1 or 0 wheter consent has been given or not.
How simple is that? I immediately read that, for instance, G101 means analytics_storage is granted while ad_storage is not, and so on for any other possible combination.

The trick I found to remember how to read the gcd parameter 

Serendipity, as usual, has shown me the way again this time. I was playing with a table taken from the guide I mentioned on Simo's blog, when sorting the rows on Google Sheets I realized there was a pattern.

The table taken from Simo's blog (credits)

A simple alphabetical sorting in the Letter column unveils there are 3 letter groups: 

  1. the 1st letter group (l, m, n) represents consent signals where the default command is not recorded altogether
  2. the 2nd one (p, q, r) represents consent signals where the default command sets to denied
  3. the 3rd one (t, u, v) represents consent signals where the default command sets to granted.
Then, each letter of each letter group represents the consent signal after the update command has been executed. Therefore:
  1. letters in the 1st position (l, p, t) represent consent signals where the update command is missing 
  2. letters in the 2nd position (m, q, u) represent consent signals where the update command sets to denied
  3. letters in the 3rd position (n, r, vrepresent consent signals where the update command sets to granted.

I know this can still be a bit confusing so the table below is worth a thousand words.

The table that helped me understand how to read the gcd parameter

Conclusions

I guess there are other people who already found that pattern and are using it to read the gcd parameter. Some other people are instead ignoring this topic altogether. 

However, I hope there's someone else who will find this tip useful for the day by day debugging.

Jan 22, 2024

Validate how UTM tags are assigned to default channel groups in GA4

Last summer I've attended the GA4 Summit event organized by Tag Manager Italia, here in Italy. In particular I remember a talk by Steen Rasmussen titled "Campaign tracking and attribution in GA4 - Tips, tricks and tactics", an inspiring one - as always by Steen, as far as I can tell - about the new importance of campaign tracking caused by the transition to GA4.

Starting from there, in the last few months I focused my attention on campaign tracking, especially how to tag campaigns and how they are assigned to GA4 default channel groups. Some tools came in handy, for instance the UTMprep.com by Steve Lamar, but then taking the course Query GA4 Data In Google BigQuery by Johan van de Werken and Simo Ahava I realized there were chances to programatically optimize the validation of UTM tags lists which is quite an expensive task.

Here's why I decided to take a step forward using Python and Colab to create a script with this purpose in mind. This post is about how the script I created works and how to use it, for anyone interested. 

How to use the GA4 UTM tags classifier

For those experienced in Python who want to dig deeper how the script works please jump to the next section of this post.
For those scared by the code, take a breath, you can simply ignore it since Colab will do everything for you. Please keep reading this section since it includes a step by step guide on how to use my script.
For both, the script is available at this link.

1. Open the script in Colab 

In the Github page I provided above there's a blue button "Open in Colab": That's the recommended way to rapidly use the script without installing Python or other boring stuff :)

2. Sign-in with a Google account

Then click the folder icon on the left side panel of Colab. After a while you will see a folder named "sample_data" appearing but you can ignore it since we need to upload our own files there.

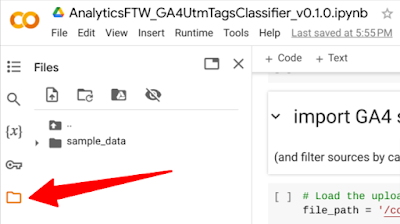
Clicking the folder icon in Colab to add files

3. Upload the files to process

We need two files to make the script work.
  • The 1st one is a list of GA4 source categories, the one Google references in its documentation, available at this link. Unfortunately it's a PDF, which is crazy in my opinion considering it's even mentioned as a spreadsheet by Google itself. This is why I copy/pasted the content of the PDF in a real spreadsheet that I'm making available at this link (safely stored on Google Drive).
  • The 2nd file is another spreadsheet with the list of source, medium and campaign parameters to validate. This must have three columns named exactly "Source", "Medium" and "Campaign".
Both the files have to be named exactly as I did. Therefore, the 1st one must be named "NK_AnalyticsFTW_GA4SourceCategories.xslx", the 2nd one "Check.xslx".

4. Run all code cells in the Colab notebook

To do so, you have to click Runtime / Run all found at the top navigation bar in Colab.

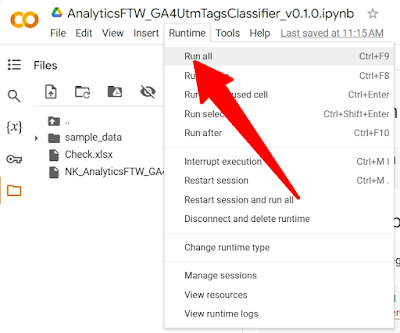
Clicking Run All in the Colab notebook to execute the script

5. Get the results file and enjoy! 

Once the script ends its execution you will find another file inside the Files section of Colab. Just download the file and start your assessment in Excel or any spreadsheet software of your choice.
 
If you don't see a file named "results.xslx" immediately, just hit the Refresh button as in the snapshot below.

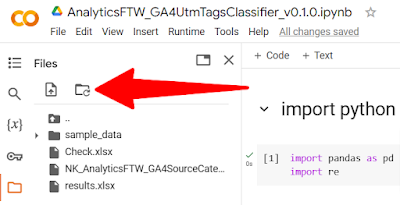
Clicking the refresh button in Colab to update the Files section

Explanation of the GA4 UTM tags classifier, for coders

In this section I will explain the script almost line by line in order to understand how it works. This is especially important for experienced coders who want to help reviewing my code or just customizing it.

If you're wondering, I don't think I'm a good Python coder so let me precise most of the code has been created using ChatGPT and then I added something here and there to make it work as I wanted.

Disclaimer: Google Blogger does not allow me to paste code blocks easily so the excerpts you're going to find here are just meant as references. 

1. Import python libraries

We just need a couple of simple libraries for this script to work:
  • pandas manages data frames
  • re is the library we need to process the RegEx Google uses to interpret some parameters.

2. Import GA4 source categories file

Here we load the file with the list of source categories taken from Google documentation. For those jumping right here, as I previously wrote, I copy/pasted the content of the PDF in a spreadsheet I'm making available at this link (safely stored on Google Drive).

==============================
# Load the uploaded Excel file
file_path = '/content/NK_AnalyticsFTW_GA4SourceCategories.xlsx'

# Assuming the values are in the first column of the first sheet, we'll read that column
values_df = pd.read_excel(file_path)
==============================

After reading the file, the cell code filters rows creating the following sublists: SOURCE_CATEGORY_SHOPPINGSOURCE_CATEGORY_SEARCHSOURCE_CATEGORY_SOCIAL and SOURCE_CATEGORY_VIDEO.  

==============================
# Filtering the values from the Excel file where 'source category' is 'SOURCE_CATEGORY_SHOPPING'
filtered_shopping_sources = values_df[values_df['source category'] == 'SOURCE_CATEGORY_SHOPPING']['source'].tolist()
==============================

3. Upload the file to check

The next cell reads the file with the list of source, medium, campaign parameters we want to assess. 

==============================
uploaded_file_path = '/content/Check.xlsx'
df = pd.read_excel(uploaded_file_path, na_filter=False)
==============================

4. Map the input UTM tags

Finally, the last cell in the notebook is the main part of the script. 

The first part gives a name to any possible RegEx patterns to use afterwards. I've decided to keep each possible pattern distinct even if they are actually duplicates of others since I wanted to be  prepared for any possible future change.

==============================
# Define the regex patterns
# Some of them are duplicates but they could change in the future
paid_shopping_campaign_pattern = r'^(.*(([^a-df-z]|^)shop|shopping).*)$'
==============================

Then, comes the core function check_condition.

The first rows of the function take the columns of the Excel to convert their content in lower cases. I have to say thanks to Luka Cempre about this part since looking at the SQL code he posted on Linkedin I noticed my code was missing it.

==============================
Source = row['Source'].lower()
Medium = row['Medium'].lower()
Campaign = row['Campaign'].lower()
==============================

An if, elif, else statement is in charge of assigning the parameters to GA4 default channel groups. The order of the lines is the same that can be found in the table "Channels for manual traffic" in Google Analytics Help.

==============================
if Source == '(direct)' and Medium in ['(not set)', '(none)']:
return 'Direct'

elif Campaign == 'cross-network':
return 'Cross-network'

elif Source in filtered_shopping_sources or (re.match(paid_shopping_campaign_pattern, Campaign) and re.match(paid_shopping_medium_pattern, Medium)):
return 'Paid Shopping'

==============================

In the code above, I extracted some lines from the function to show how a Direct, Cross-network and Paid Shopping channel groups are assigned to source, medium and campaign parameters. Both the RegEx patterns showed earlier in this section and values with lower case kick in here to make the code more readable.

Finally, this code cell applies the Python function to the rows to check and the data frame is exported to an Excel file named "results.xslx".

==============================
# Apply the function to each row
df['Default channel group'] = df.apply(check_condition, axis=1)

# Display the DataFrame
#df.head()

# Export the DataFrame
df.to_excel("results.xlsx", sheet_name='UTM tagging classification', index=False)
==============================

Final thoughts

I hope the script I created will help classifying UTM parameters into GA4 channel groups as smoothly as possible!  
I find Google documentation to be hard to understand for average marketers and all the steps required to do so are too time-consuming. 

Hopefully, Google will change something in the future, but for now, my little script can be one of the ways to go.